So after publishing my last post, I noticed that I couldn't query the Hasnode API for the number of views for an individual post and this was kinda getting to me. My site runs on Next.js and is deployed to Vercel. I had Vercel Analytics on so I could see the views per page but I couldn't get that into the UI. After looking everywhere I couldn't get it to work then I remembered I also use Firebase. So here's how I used Firebase FIrestore to track views on my blog posts.
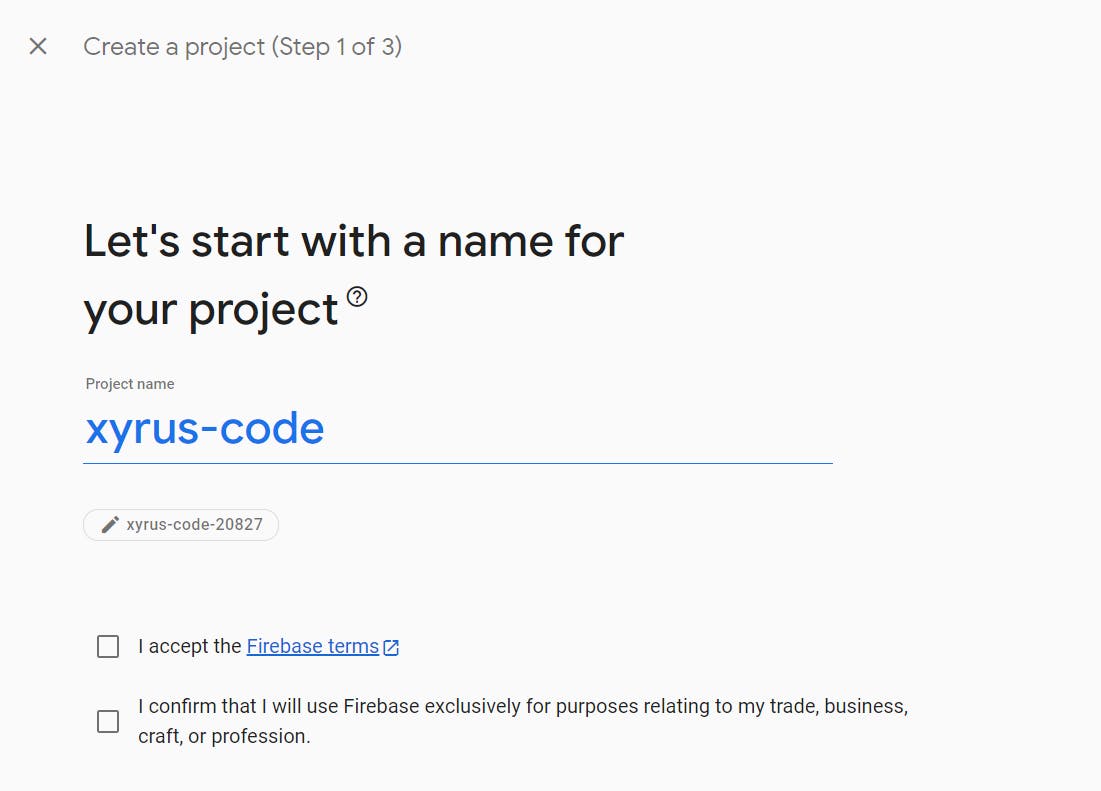
First things first, you'll need a Firebase Project. So head over to Firebase and create one.

You'll have to accept the terms and conditions and you might want analytics but that's really up to you. After all that initial setup you'll be greeted by this:

Now for the fun part. You are going to create a Firestore Database. It's in the Build section over there. Right there, left-hand side, your left not my left. There we go.
Then you'll need to create a new database and you'll want to start in test mode.
Then you'll add a collection and add a document to it as well.
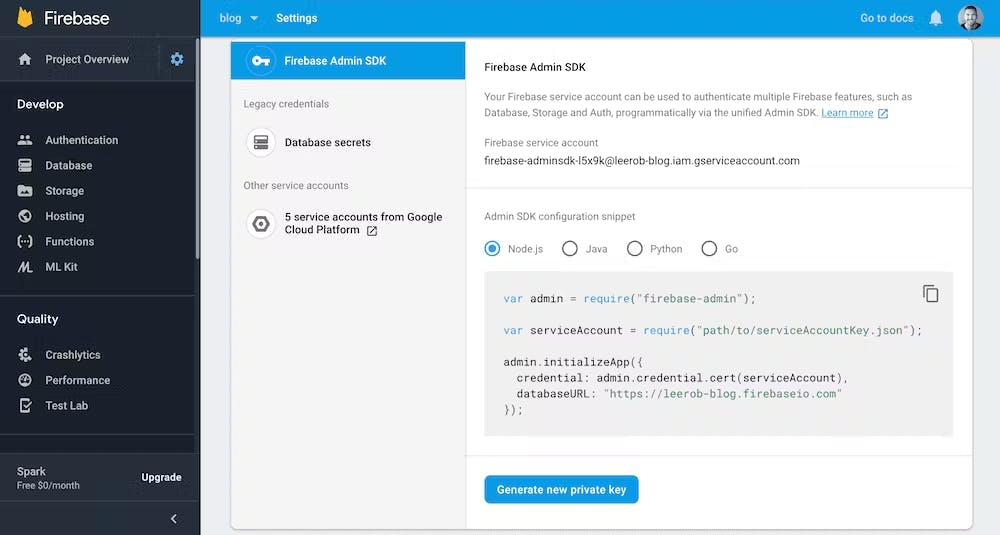
In the top left, click on "Project Settings".

Head over to "Service Accounts" tab and click "Generate new private key". Save the .json file. We will get our environment variables from this.

All done? Cool. Now we code.
Fetching Data from Firebase
You'll want to locate your Next.js blog and open a terminal within its directory. Then, install the firebase-admin package and SWR. SWR is a React Hooks library for remote data fetching, while Firebase-admin adds Firebase functions to our project. Initially, SWR returns the data from the cache (stale), then sends the fetch request (revalidate), and finally provides the up-to-date data once more.
This will allow us to fetch view counts from Firebase. The best part is SWR will automatically revalidate data. So you don't have to handle that yourself. Yes, I'm looking at you, React Query.
Let's install them now.
npm install --save firebase-admin swr
Next, we need to create an .env.local file to add the values for the Firebase service account .json file. Specifically, private_key, project_id, and client_email.
.env
NEXT_PUBLIC_FIREBASE_PROJECT_ID=replace-me
FIREBASE_CLIENT_EMAIL=replace-me
FIREBASE_PRIVATE_KEY="replace-me"
Make sure you include the quotes around "replace-me" for FIREBASE_PRIVATE_KEY.
You will need to restart your application to load new environment variables. Create a new file lib/firebase.ts.
lib/firebase.ts
import * as admin from 'firebase-admin';

if (!admin.apps.length) {
  admin.initializeApp({
    credential: admin.credential.cert({
      projectId: process.env.NEXT_PUBLIC_FIREBASE_PROJECT_ID,
      clientEmail: process.env.FIREBASE_CLIENT_EMAIL,
      privateKey: process.env.FIREBASE_PRIVATE_KEY?.replace(/\\n/g, '\n'),
    }),
  });
}

const db = admin.firestore();

export { db };
Tracking Views
To track a view, we need to look at the database for views -> id. Let's create a new API Route to communicate with our database and increment the views for a given id.
API Routes provide a straightforward solution for building an API inside Next.js. All you need to get started is a api/ folder inside your main pages/ folder where your routes live. Every file inside pages/api/ is mapped to /api/*.
pages/api/views/[slug].js
import type { NextApiRequest, NextApiResponse } from 'next';
import { db } from "lib/firebase";

export default async (
  req: NextApiRequest,
  res: NextApiResponse
) => {
  const viewsRef = db.collection('views').doc(req.query.slug);

  if (req.method === 'POST') {
    try {
      const transactionResult = await db.runTransaction(async (transaction) => {
        const doc = await transaction.get(viewsRef);
        let views = 0;

        if (doc.exists) {
          const data = doc.data();
          views = data ? data.views : 0;
        }

        transaction.set(viewsRef, { views: views + 1 });

        return views + 1;
      });

      return res.status(200).json({ total: transactionResult });
    } catch (error) {
      console.error('Error updating views:', error);
      return res.status(500).json({ error: 'Internal Server Error' });
    }
  }

  if (req.method === 'GET') {
    try {
      const snapshot = await viewsRef.get();
      const viewsData = snapshot.data();
      const totalViews = viewsData ? viewsData.views : 0;
      return res.status(200).json({ total: totalViews });
    } catch (error) {
      console.error('Error retrieving views:', error);
      return res.status(500).json({ error: 'Internal Server Error' });
    }
  }
};
View Counter
Let's create a ViewCounter component to use SWR.
I like to type everything out. So here's my View type:
lib/types.ts
export type View = {
  total: number;
};
You'll need a fetcher function as well.
lib/fetcher.ts
export default async function fetcher<JSON = any>(
    input: RequestInfo,
    init?: RequestInit
  ): Promise<JSON> {
    const res = await fetch(input, init);
    return res.json();
  }
components/ViewCounter.tsx
import { useEffect } from 'react';
import useSWR from 'swr';

import fetcher from 'lib/fetcher';
import { View } from 'lib/types';

type Props = {
  slug: string;
  isCard: boolean;
};

const ViewCounter = ({ slug, isCard }: Props) => {
  const { data } = useSWR<View>(`/api/views/${slug}`, fetcher);
  const views = new Number(data?.total);


  useEffect(() => {
    if(!isCard){
    const createView= () =>
      fetch(`/api/views/${slug}`, {
        method: 'POST'
      });

    registerView();}
  }, [isCard, slug]);

  return <span>{`${data?.total! > 0 ? data?.total.toLocaleString() : '–––'} views`}</span>;
};

export default ViewCounter;
Finally, we can consume the view counter in our blog post and pass in the slug.
<ViewCounter slug="my-post" />
Deployment Notes
When adding your Firebase private key inside the Vercel or Netlify dashboard, ensure that you convert new line characters (\n) to actual new lines.
Feel free to let me know how it works out for you in the comments.

